
[SKRB Tips] Analysis of the Grim Reaper of Attack Decks, 'Awakened Dellons'
[세나 리버스 꿀팁] 공덱의 사신 '각성 델론즈' 분석

For the many adventurers waiting with bated breath for Seven Knights Re:BIRTH (SKRB), the awakening of Delons has finally arrived. Given his legendary status as a powerhouse in the original game's PvP meta, the hype is palpable. He’s set to reclaim his throne as the cornerstone of offensive decks, just as he did in the glory days, but with a crucial survival buff tailored for the modern meta. KookminTree dives into what makes the new awakened Delons tick.
Q. What are Delons' primary skills after transforming?
A. Every single skill is designed to deal fatal damage to the opposition.
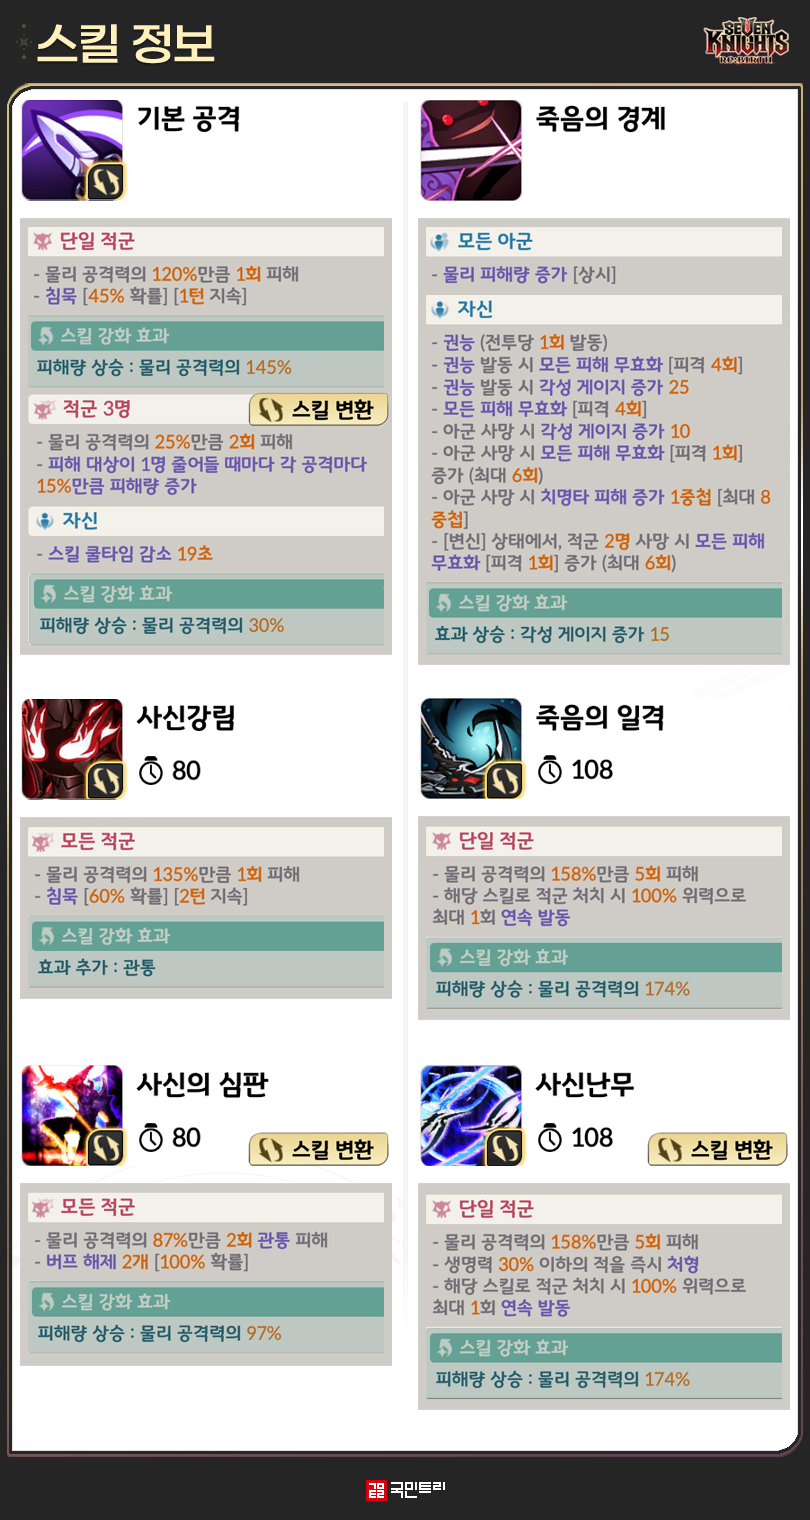
It’s fairly obvious why Delons is the go-to main dealer for offensive decks: his passive gives him absurd firepower. If his allies manage to stay upright, you can even stick him in the front line and he’ll still out-damage just about everyone. It gives you the flexibility to distribute your offensive pressure rather than relying solely on a 'main carry' slot—a solid choice if you aren't running into too many defensive turtle teams.
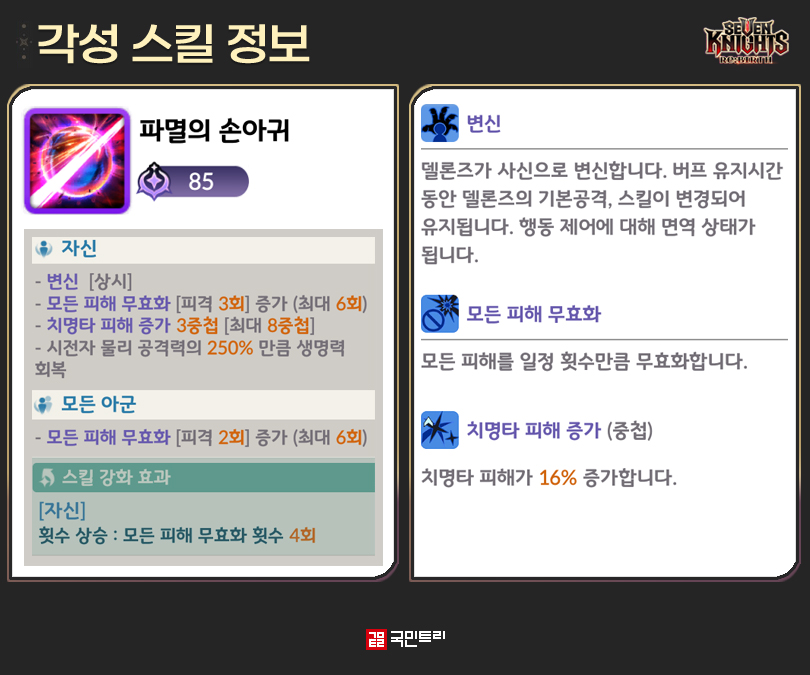
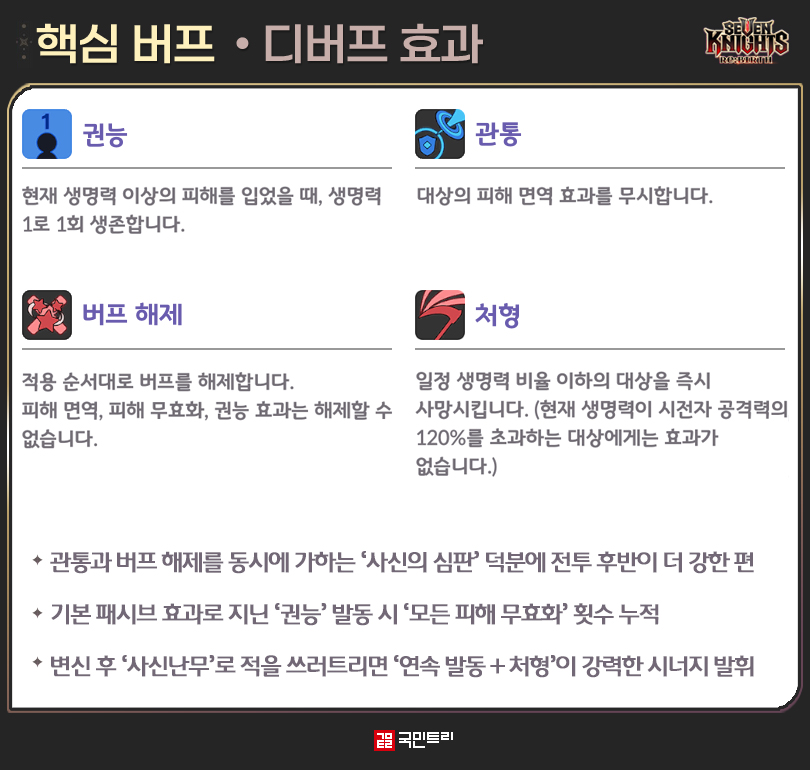
The secret sauce is his passive, 'Boundary of Death.' Every time an ally falls, he gains a stack of damage immunity and 16% critical damage. You get up to 6 stacks for immunity and 8 for crit damage. While 8 stacks might sound like a tall order, it’s surprisingly easy to hit. It counts even if allies revive via immortality or resurrection effects, and using his awakening skill instantly grants 3 stacks. By the time he transforms, he’s basically at max power.
Post-transformation, he also gains damage immunity whenever an enemy falls. Once Delons enters his Reaper form, the fight becomes a game of attrition where he uses that reliable immunity to pick off enemies one by one. Even if he’s the last man standing, a bit of luck can turn the tide of a losing battle.
Q. How should the operation of a Delons offensive deck change before and after the awakening skill?
A. Focus on surviving with various defensive tools, then mop up with buff removals and executions after he transforms.
You can't pilot a Delons deck the same way before and after he transforms. Before transformation, your priority is filling that awakening gauge as fast as possible. While leaning on heavy hitters like Lu Bu or Teo for early pressure is a viable strategy, it really depends on who you're facing. If you want consistency, I’d suggest prioritising Delons’ transformation to unleash his full potential.
The real trick here is keeping him alive. The current SKRB PvP meta is obsessed with status effects—just look at Skuld and Reginleif in magic decks, or Gellidus in defensive ones. Even with his recent buffs, Delons is still vulnerable to these pesky debuffs. I’ll break down how to patch that up in the equipment section below.
Once Delons successfully transforms, the gloves are off. His 'Reaper's Judgment' skill is particularly nasty against magic decks that rely heavily on immortality. It deals piercing damage to all enemies and, crucially, has a 100% chance to strip two buffs. You’ll be tearing through their immortality shields like paper.
Q. Any tips for setting up Delons?
A. His raw damage is already high enough, so I recommend focusing on 'Effect Resistance' for his armor.

As mentioned, status effects are his Achilles' heel. If you have allies like Rindr or Karl Heron to bail him out, you’re fine, but given his strength in late-game scenarios, he’ll often be left alone. Aiming for 100% Effect Resistance is your best bet to cover this weakness. His passive provides more than enough damage, so don’t stress over offensive armor stats.
For the rest, aim for the standard 100% Crit Rate and 100% Weakness Attack. If you can squeeze in that 100% Effect Resistance, you’re golden. Don’t waste slots on extra Attack or Crit Damage—the late-game scaling is already sufficient. My recommended priority for current arena setups is: Crit Rate > Effect Resistance > Weakness Attack.
'세븐나이츠 리버스(이하 세나 리버스)'의 많은 모험가들이 손꼽아 기다린 델론즈의 각성이 나왔다. 과거 원작 시절 PvP 콘텐츠 메타에 정점에 올랐던 이력 덕분에 모험가들의 관심이 더욱 크다. 당시 공덱 인기를 주도했던 것과 마찬가지로 세나 리버스에서도 같은 포지션으로 그가 활약할 전망이다. 아울러 각성 출시와 함께 최신 메타에 맞도록 생존력 상향이 이뤄졌다. 새롭게 바뀐 각성 델론즈를 국민트리가 분석했다.
Q. 변신 후 델론즈의 주력 스킬은?
A. 어떤 스킬이든 상대에게 치명상을 가합니다
델론즈가 공덱의 메인 딜러를 자처하는 이유는 간단하다. 패시브 효과 덕분에 화력이 매우 높기 때문이다. 심지어 그를 지원하는 아군이 모두 살아남은 경우에는 전방에 배치해도 메인 딜러급 화력을 뽐낼 정도다. 공덱 편성 시 메인 딜러 자리를 고집할 필요 없이 전략적인 화력 배분도 가능하다는 의미다. 방덱 매칭이 적은 구간에서 택할 수 있는 전략이다.
이러한 활용의 핵심은 패시브 스킬 '죽음의 경계'에 있다. 이는 아군이 쓰러질 때마다 모든 피해 무효화 1회와 치명타 피해를 16%씩 쌓는다. 전자는 최대 6회, 후자는 최대 8중첩이다. 치명타 피해의 경우 8회를 쌓으려면 다소 많아 보일 수 있으나, 실제로는 손쉽게 달성 가능하다. 아군이 부활이나 불사 효과로 인해 쓰러졌다가 다시 일어나는 경우에도 쌓이는 데다, 델론즈가 각성 스킬을 사용하면 즉시 3회를 중첩한다. 사실상 각성 스킬로 변신할때쯤 최대 중첩에 도달하는 정도다.
변신 이후에는 해당 효과와 더불어 적이 쓰러지는 경우에도 델론즈가 모든 피해 무효화를 얻는다. 각성 델론즈의 변신 이후 전투는 피해 무효화의 안정적인 생존력을 바탕으로 높은 피해량으로 적을 하나씩 쓰러트리는 양상이 된다. 델론즈가 혼자 살아남더라도 운이 좋으면 역전의 각을 노려볼 수도 있다.
Q. 각성 스킬 사용 전, 후 델론즈 공덱의 운영 변화는?
A. 각종 생존 능력으로 최대한 버티고 델론즈 변신 후 '버프 해제·처형'으로 정리
델론즈 공덱은 그의 변신 전과 후의 운영이 다르다. 변신 전에는 가능한 각성 게이지를 빠르게 쌓는 것이 좋고, 이후에는 스킬을 난사하는 방식이다. 물론 공덱 특성상 '여포'나 '태오' 같은 강한 영웅으로 초반을 몰아붙이는 것도 좋지만, 어떤 파티를 만나냐에 따라 유불리가 있다. 따라서 범용성을 생각한다면 델론즈가 빠르게 변신한 뒤 화력을 몰아붙이는 방식을 권한다.
여기서 핵심은 델론즈의 생존이다. 최근 세나 리버스 PvP 메타의 중심에는 상태 이상 효과가 빠지지 않는다. 마덱의 '스쿨드'와 '레긴레이프', 방덱의 '겔리두스'와 같은 영웅들이 그 중심에 있다. 델론즈가 이번 상향으로 권능을 얻긴 했으나, 언급한 영웅들의 상태 이상에 취약한 것은 어쩔 수 없다. 이를 보완하기 위한 방법은 후술할 장비 세팅 부문에서 자세히 설명하겠다.
델론즈가 무사히 변신에 성공했다면 이제 망설이지 않아도 된다. 특히, 불사 의존이 큰 마덱을 상대로 변신 후 '사신의 심판'스킬이 치명상을 입힐 수 있다. 모든 적에게 관통 피해를 입히는 것과 더불어 '버프 해제'효과가 함께 붙어있어 100% 확률로 2개의 버프를 제거한다. 높은 확률로 상대의 불사 효과를 앗아갈 수 있다는 의미다.
Q. 델론즈 세팅 시 주의 사항은?
A. 화력은 충분히 강하므로 방어구는 '효과 저항'을 추천
앞서 언급했듯 델론즈가 가장 취약한 부분이 상태 이상 효과다. 아군에서 이를 케어할 '란드그리드'나 '칼 헤론'과 같은 영웅이 살아 있다면 큰 문제는 없지만, 전투 후반 활약상이 도드라지는 특성상 혼자 살아남았을 때를 가정할 수밖에 없다. 그나마 약점을 커버할 수 있는 방법이 효과 저항 100% 세팅이다. 패시브 덕분에 화력은 충분하니 방어구는 해당 옵션을 챙기길 권한다.
나머지 능력치는 다른 메인 딜러와 마찬가지로 치명타 확률 100%, 약점 공격 100%를 목표로 삼자. 베스트는 여기에 효과 저항도 100%를 달성하는 것이며, 공격력이나 치명타 피해는 굳이 챙기지 않아도 된다. 특히, 치명타 피해는 전투 후반에 들어간 델론즈에게는 충분히 높다. 현재 결투장 환경에서 추천하는 능력치 세팅의 순서는 '치명타 확률 - 효과 저항 - 약점 공격'이다.

-
 [SKRB Action] The Reliable Support for Defensive Decks, 'Clemis'
-
 [Raven 2 Tips] Remaining Schedule for the Grand Festival Finale and Key Rewards Summary
-
 [SKRB Re:PLAY] June - 'Defense Deck New Meta' Emerges with Awakening
-
 [Global Talk] Evenly distribute 'Slot Enhancement' in Game of Thrones: Kingsroad
-
 [Dungeon Race] The '8-second' era begins with [B&S Revolution] Illusionist
-
 [Weekly Forum Highlight] Check the response to the Vampir 'Gehenna' suggestion
-
 [Storyboard] Game of Thrones: Kingsroad, beware of the 'Lannister House'!
-
 [Weekly Forum Highlight] Check the answers to the 'Disciple's Letter' in B&S Revolution

- Girls' Frontline mobile competitive shooter development halted after 8 months
- POE 2, A 'Martyr' Appears Who Provided Server-Wide Buffs Through Max-Level 'Character Deletion'
- [Today's steam] New hide-and-seek game where you paint your own body to blend in draws attention
- The Elder Scrolls 6 reaches playable build stage
- Kairosoft Announces Restaurant Management Simulation Set in the One Piece Universe
- Development Resumes for Princess Maker: Children of the Prophecy, Update Scheduled for Late June
- Realistic Promotion Strategies Introduced by Small Indie Developers
- [Game Recs] The irresistible fun of build crafting, 5 masterpiece survivor-likes
- [Today's steam] Taskbar Hero remains unstable despite marketplace closure
- New Releases for the Second Half of the Year: Nintendo Direct Airing at 11 PM on the 9th