
[KOF AFK Tips] A Complete Guide to Fighter 'Synergy' for Better Team Compositions
[킹오파 AFK 꿀팁] 알고 편성하면 더 좋은 파이터 '시너지' 총정리
In 'The King of Fighters AFK' (hereinafter 'KOF AFK'), fighters possess 'Synergy' effects. The mechanic is simple: slotting two or three fighters with matching synergies into your party activates the boost. Note that Orochi Iori and Orochi Leona wield 'Special' synergies that trigger even when fielding only one of them. These effects unlock from stage 351, and since they can drastically bolster your party's combat prowess, it is wise to study them early. KookminTree has compiled the definitive guide to KOF AFK synergy effects and recommended fighters.
Attack-oriented Synergies: Fury, Erosion, Execution, and Surge
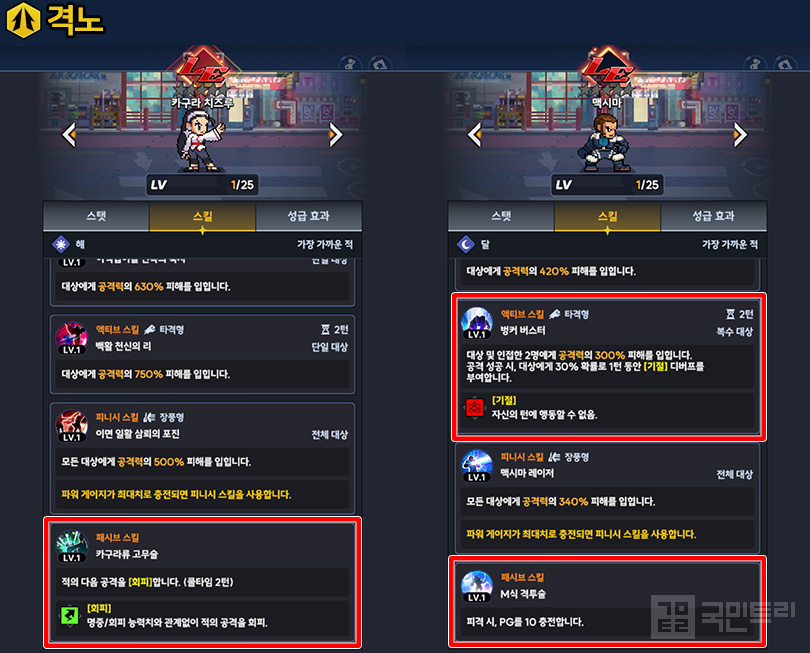
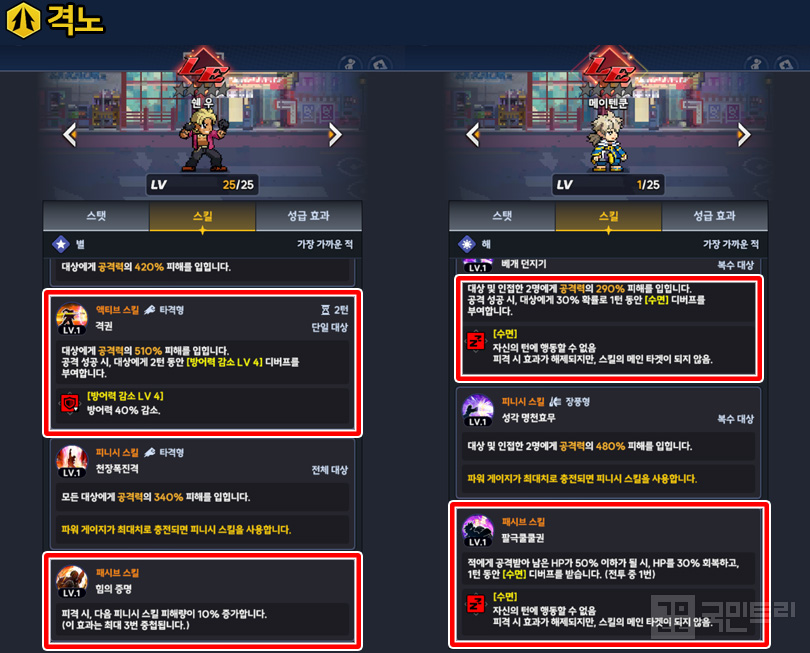
Fury pumps up the damage of your 'Finish Skills'. A 2-fighter setup grants a 100% boost, which climbs to 120% with 3 fighters. Among the offensive synergies, this is easily the most versatile. Top picks include Chizuru, Maxima, Shen, Meitenkun, and Kensou. Chizuru boasts a 2-turn cooldown evasion, while Maxima gains 10 PG upon being hit and packs a stun for two enemies. Shen shreds a single target's defense by 40% and features a passive that stacks Finish Skill damage up to three times, pairing perfectly with this synergy.
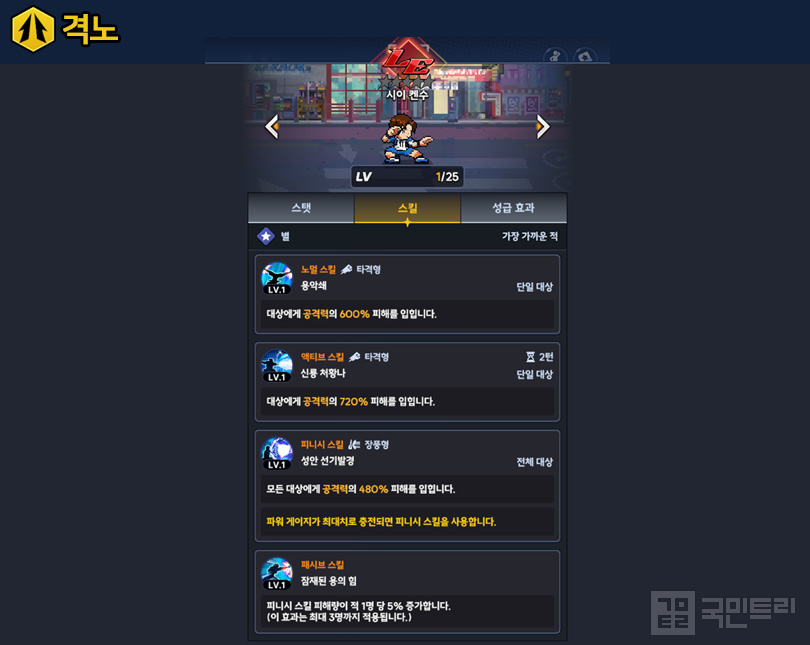
Meitenkun puts two enemies to sleep, rendering them 'incapacitated and untargetable for skills'. This effect breaks upon taking damage, allowing you to effectively stall enemy turn patterns. Kensou's passive adds 5% Finish Skill damage per enemy, stacking to 15%. Just be aware that its efficiency drops when facing a lone dungeon boss.
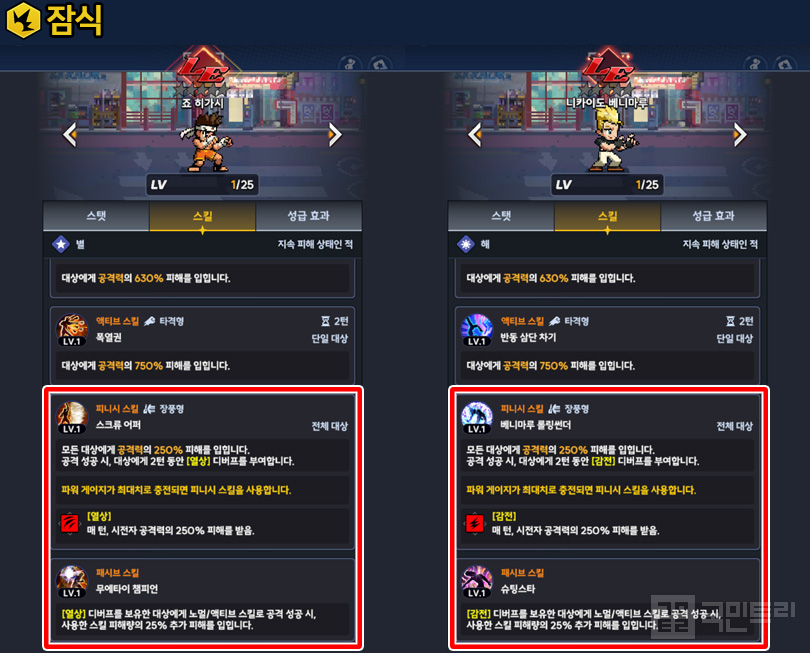
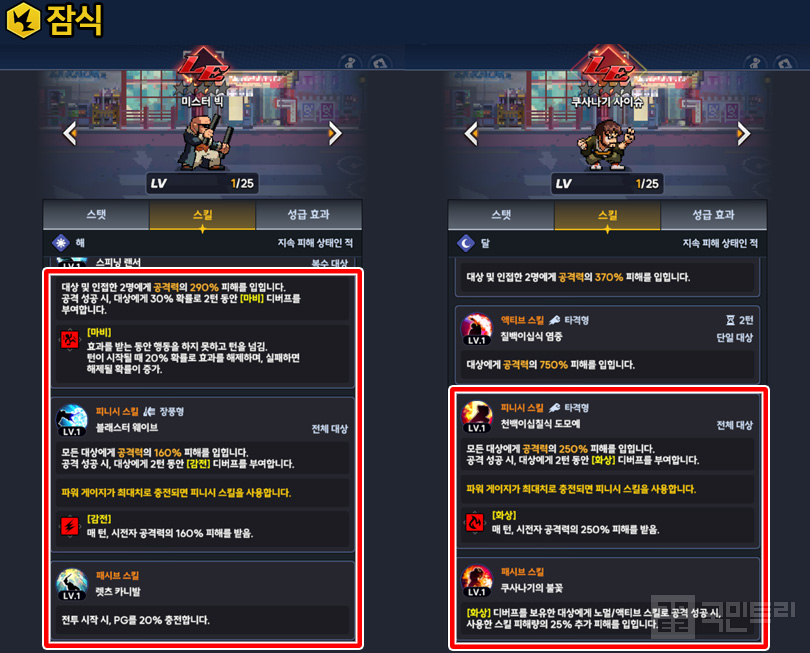
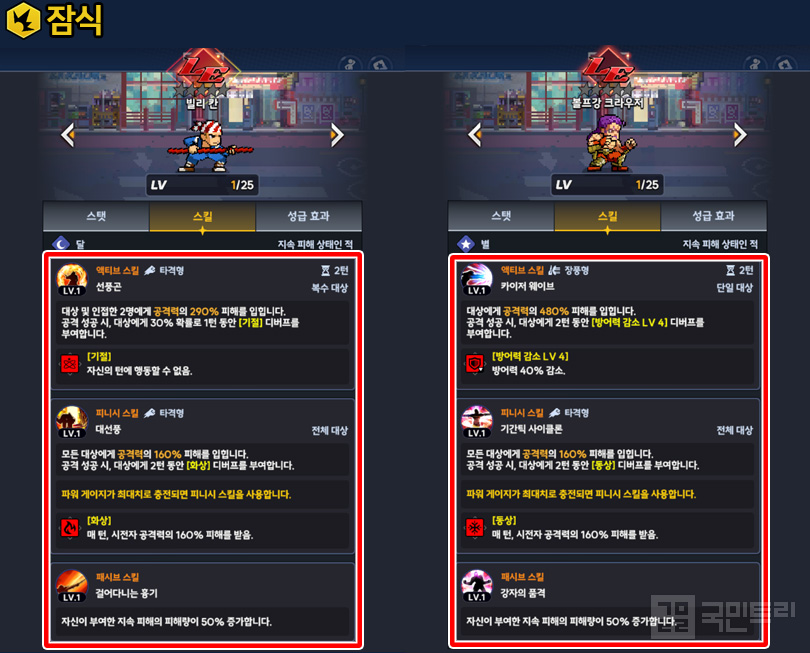
Erosion is the go-to for those stacking damage-over-time (DoT) and supplementary damage. Like Fury, it scales to 100% and 120% based on party size. If your roster relies on persistent attrition, this is your synergy. Recommended fighters: Joe, Benimaru, Mr. Big, Saisyu, Billy, and Krauser.
Joe applies 'Laceration' for turn-based damage, while Benimaru and Mr. Big favor 'Electrocution'. Saisyu and Billy bring the 'Burn', and Krauser inflicts 'Frostbite'. These fighters all excel at stacking debuffs, making them a natural fit.
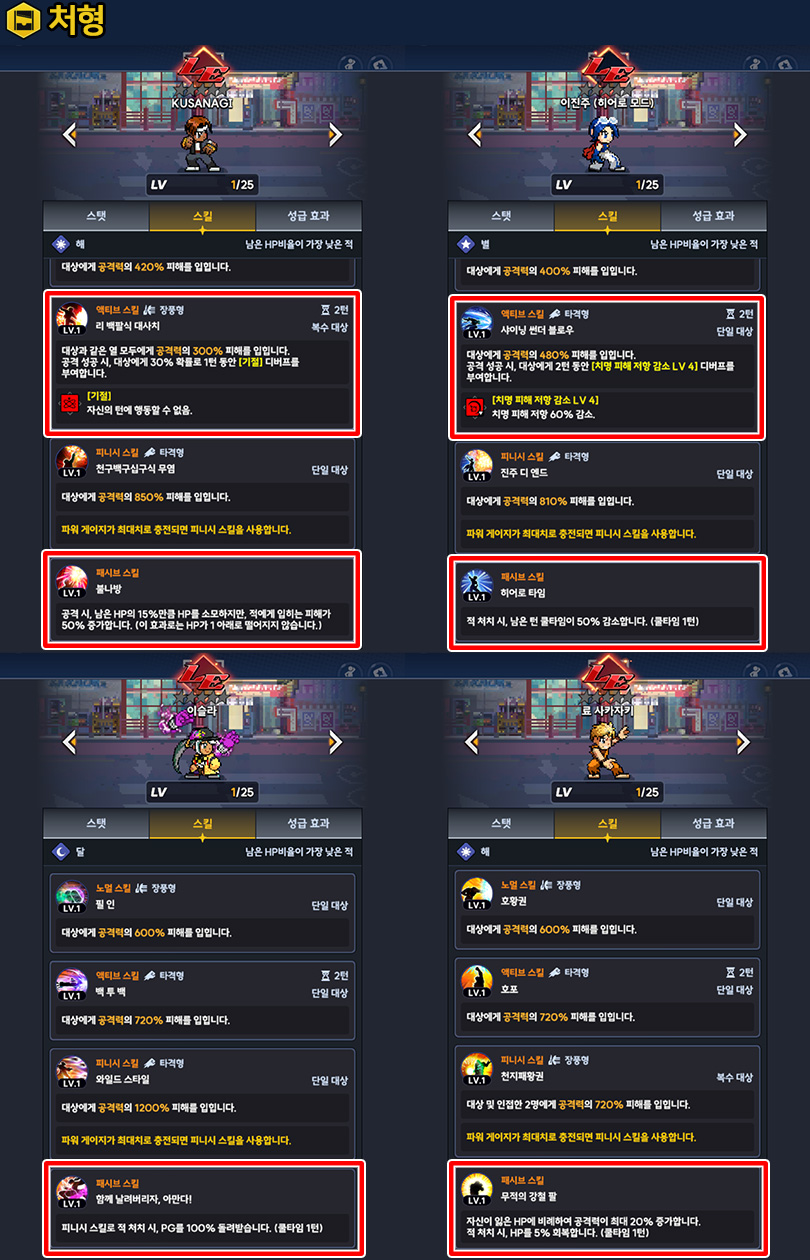
Execution focuses on snowballing; you gain increased damage for your next attack upon defeating an enemy. This provides a 75% to 90% damage boost, which is instrumental for clearing stages quickly. Recommended fighters: KUSANAGI, Lee Jinju, Isla, and Ryo.
KUSANAGI strikes all enemies in the target's row and, via a passive, sacrifices some HP to deal 50% bonus damage. Lee Jinju reduces skill cooldowns by 50% after a kill and applies a 60% critical damage resistance reduction debuff to the target. While all skills are single-target, the passive allows for rapid-fire active skill usage.
Isla recovers 100% of her PG if she secures a kill with a Finish Skill, effectively allowing for back-to-back finishers. Combined with the Execution synergy, the damage output is massive. Ryo increases his attack power by up to 20% in proportion to his missing HP and restores 5% HP upon downing an enemy.
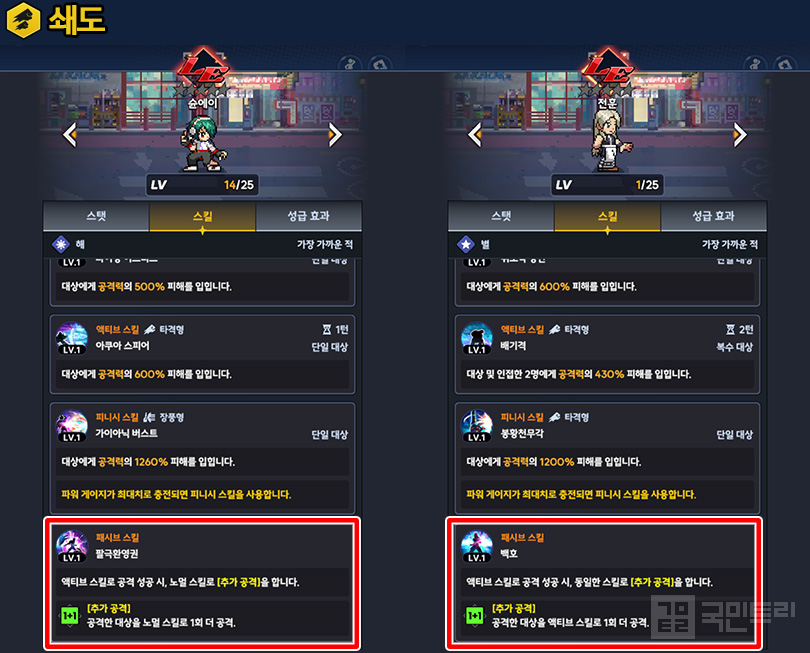
Surge boosts damage for normal and active skills. Because these are used frequently, the coefficients are lower, at 50% and 60% respectively. Recommended fighters: Shun'ei and Jeon Hoon.
Shun'ei's passive triggers a normal skill whenever an active skill lands. Jeon Hoon simply uses an active skill twice. They are the prime candidates to fully leverage Surge's damage buffs. Pairing this with Erosion can further amplify the extra attack damage.
Defense-oriented Synergies: Endurance, Wedge, and Solidarity
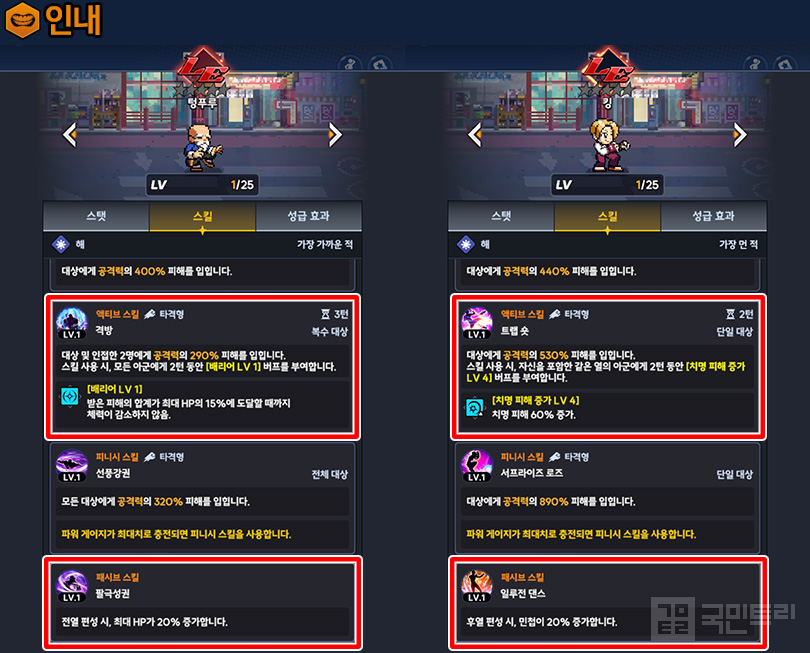
Endurance boosts the defense and HP of your entire team. A 2-fighter setup grants 10% defense and 15% HP, while 3 fighters bump this to 20% and 25%. Recommended fighters: Tung Fu Rue and King.
Tung Fu Rue grants a 2-turn barrier to the whole team via an active skill, with damage absorption capped at 15% of max HP. With a passive that boosts HP when placed in the front row, plus the Endurance synergy, Tung Fu Rue's effective HP can soar by 35% to 45%. King increases her own agility to secure turns faster, allowing her to trigger active skills early and provide a critical damage buff to allies in the same row.
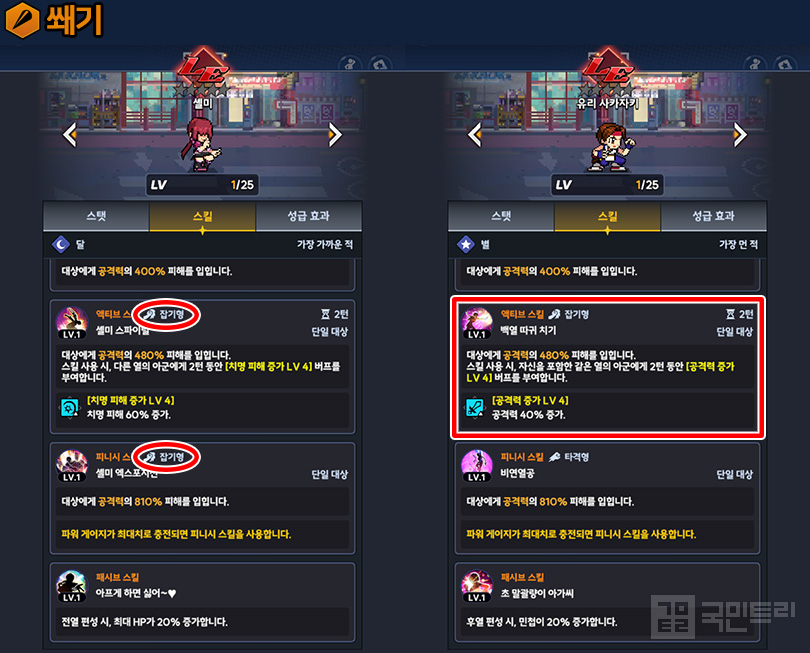
Wedge increases HP by 15-25% and boosts penetration—which lowers enemy defense—by 10-20%. It is a solid choice for balancing sustainability and damage. Recommended fighters are Shermie and Yuri. Shermie utilizes 'grapple' skills that hit every enemy except for certain massive bosses, ensuring the penetration bonus lands. Yuri boosts the attack and agility of allies in her row to seize the initiative, and since her active is also a grapple-type, she enjoys the same benefits as Shermie.
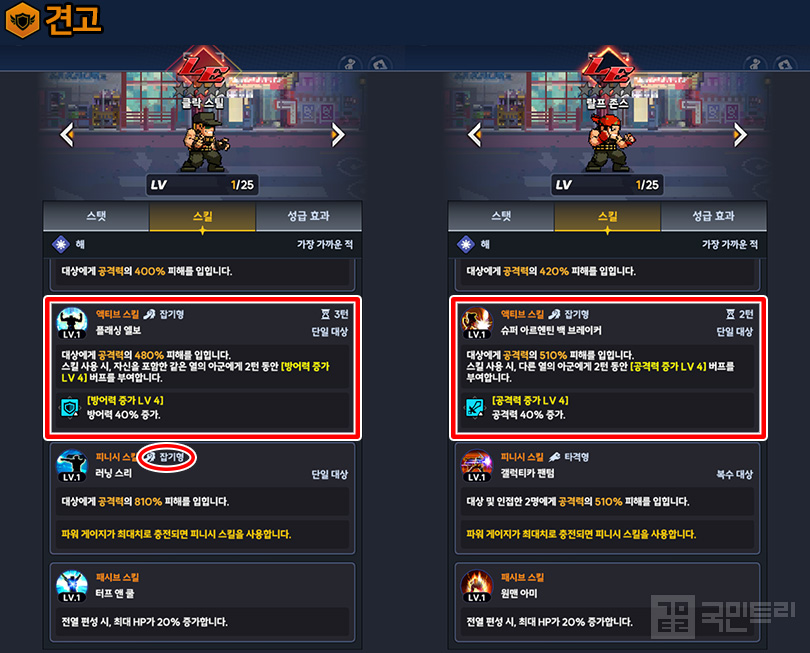
Solidarity focuses on critical damage resistance and HP. Since it specifically mitigates critical hits, it is best utilized in PvP. Depending on the setup, critical damage resistance increases by 20-40% and HP by 15-25%. Recommended fighters are Clark and Ralf. Clark grants a 40% defense buff to allies in his row and gains 20% HP when placed in the front, cementing his role as a sturdy tank. His grapple-based active and finisher provide guaranteed damage to boot.
Ralf acts as the opposite of Clark, providing a 40% attack buff to his row. His passive also grants him extra HP. Note, however, that unlike Clark, only Ralf's active is a grapple; his finisher is a strike-type, so it can occasionally miss.
Orochi-exclusive Special Type
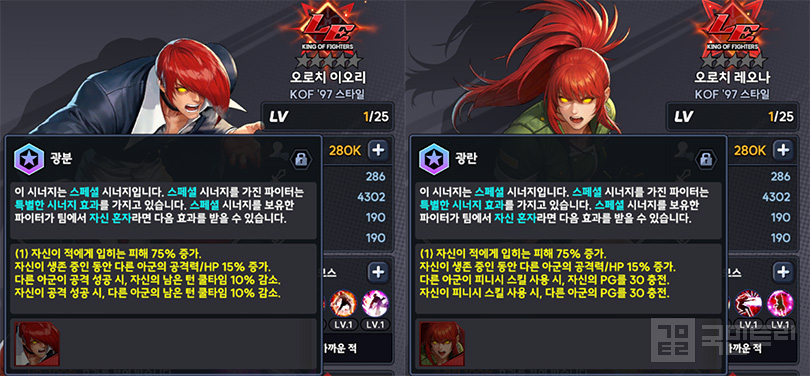
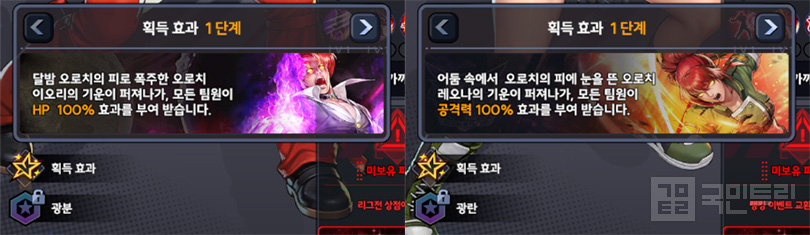
The final category is the Special type, currently limited to Orochi characters. Though bundled as 'Special', there are two distinct effects. Crucially, you can only slot one of them in your party, as their effects do not stack. There are also 'Acquisition Effects': Orochi Iori boosts the entire team's HP by 100%, and Orochi Leona boosts attack power by 100%.
Orochi Iori's 'Madness' increases his damage dealt by 75%, boosts other allies' attack and HP by 15% while he is alive, and reduces cooldowns for both himself and his team whenever anyone lands an attack. In short, he is a cooldown-reduction engine, allowing for more frequent active skill usage.
Orochi Leona's synergy is 'Frenzy'. Its main benefit is PG generation for herself and her team, with a charge value of 30 under the same conditions as Orochi Iori. She also shares the same 75% damage boost and team-wide attack/HP buffs.
As mentioned, Special synergy does not apply if both are fielded together. You must choose based on your party's core strategy. Orochi Iori pairs beautifully with Surge for cooldown-heavy rotations, while Orochi Leona’s constant PG charging makes her the perfect partner for Fury, allowing for continuous, devastating Finish Skill usage.
'킹 오브 파이터 AFK(이하 킹오파 AFK)'에 등장하는 파이터들은 '시너지' 효과가 있다. 같은 시너지를 가진 파이터 2~3명을 같은 파티에 편성하면 효과가 발휘되는 방식이다. 오로치 이오리, 오로치 레오나는 혼자서 사용해도 효과를 발휘하는 스페셜 시너지를 갖고 있다. 해당 효과는 351 스테이지부터 이용 가능한데, 시너지를 조합에 따라 파티를 더 강력하게 만들 수 있어 미리 파악해 놓으면 좋은 정보다. 이에 국민트리가 킹오파 AFK의 시너지 효과 및 추천 파이터를 정리했다.
공격 관련 시너지 격노·잠식·처형·쇄도
격노는 필살기 '피니시 스킬'의 피해량을 증가시킨다. 2명 기준 100%, 3명 기준 120% 오른다. 공격형 시너지 중 범용성이 가장 좋다. 추천 파이터는 치즈루, 맥시마, 쉔, 메이텐쿤, 켄수 5명이다. 치즈루는 2턴 쿨타임의 회피, 맥시마는 피격 시 PG 10 충전과 적 2인 기절을 보유했다. 쉔은 단일 적 방어력 40% 감소와 피격 시 최대 3중첩까지 쌓이는 피니시 스킬 피해량 증가 패시브를 자랑한다. 시너지와 궁합이 잘 맞는 능력이다.
메이텐쿤은 적 2명에게 '행동 불가, 스킬 메인 타겟 제외' 상태가 되는 수면을 건다. 피격 시 해제되는 효과며, 이를 이용해 적의 행동 패턴을 막을 수 있다. 켄수는 패시브 효과로 적 1명 당 피니시 스킬 피해량이 5%, 최대 15%까지 증가한다. 혼자 등장하는 던전 보스를 상대할 때 효력이 떨어지니 참고하자.
잠식은 지속, 추가 피해에 특화한 효과를 탑재했다. 격노와 마찬가지로 편성 인원에 따라 100%, 120% 증가한다. 지속, 추가 피해가 주력인 파이터들을 사용할 때 맞추면 좋은 시너지다. 추천 파이터는 죠, 베니마루, 미스터 빅, 사이슈, 빌리, 크라우저다.
죠는 피니시에 매턴 피해를 주는 '열상' 부여, 베니마루와 미스터 빅은 '감전', 사이슈와 빌리는 '화상', 크라우저는 '동상' 디버프를 건다. 모두 지속 피해를 부여하는 능력이 있어 궁합이 좋은 파이터다.
처형은 전투 시작 시, 적 처치 시 다음 공격 피해량이 증가하는 콘셉트다. 해당 조건에 맞춰 다음 공격 피해가 75%, 90% 상승해 스테이지를 미는 데 큰 도움이 된다. 추천 파이터는 KUSANAGI, 이진주, 이슬라, 료다.
KUSANAGI는 대상과 같은 열의 적 모두를 공격하고, 패시브로 자신의 체력을 깎는 대신 50%의 추가 피해를 입힌다. 이진주는 적 처치 시 자신의 스킬 쿨타임을 50% 줄이고, 대상에게 치명 피해 저항 60% 감소 디버프를 부여한다. 모든 스킬이 단일기지만, 패시브 스킬 덕분에 액티브를 연달아 발동할 수 있다.
이슬라는 피니시 스킬로 적 처치 시 PG를 100% 돌려받는다. 사실상 피니시로 적을 처치하면 연달아 피니시가 다시 발동된다. 처형 시너지의 효과와 함께 한층 강력한 피해를 줄 수 있다. 료는 자신이 잃은 체력에 비례해 공격력이 최대 20%까지 상승하고, 적 처치 시 스스로 체력을 5% 회복한다.
쇄도는 노멀 및 액티브 스킬 피해량이 상승한다. 두 스킬은 사용 빈도가 높다보니 상승치는 각 50%, 60%로 타 시너지에 비해 계수가 낮다. 추천 파이터는 슌에이, 전훈이다.
슌에이는 패시브 효과로 액티브 스킬 공격 성공 시, 노멀 스킬이 추가 발동한다. 전훈은 노멀이 아닌 액티브 스킬을 한번 더 사용한다. 즉, 쇄도의 스킬 피해량 증가 효과를 온전히 받는 파이터들이다. 여기에 더해 추가 공격 피해가 상승하는 잠식과 함께 시너지를 조절하면 좋다.
방어 관련 시너지 인내·쐐기·견고
인내는 아군 전체의 방어력, HP 수치를 올린다. 2명 편성 시 방어력 10%, HP 15%, 3명 편성 시 방어력 20%, HP 25%가 상승한다. 추천 파이터는 텅푸루와 킹이다.
텅푸루는 액티브 스킬로 아군 전체에게 2턴 동안 배리어를 부여한다. 이때 배리어가 받는 피해는 최대 HP의 15%다. 패시브를 통해 전열 편성 시 체력이 증가하고, 여기에 인내 시너지까지 받으면 텅푸루의 HP는 35%~45%가량 상승한다. 킹은 스스로 민첩을 올려 공격 턴을 빠르게 받는다. 이를 이용해 액티브 스킬 발동 순서를 당겨 같은 열 아군에게 치명 피해 증가 버프를 제공한다.
쐐기는 편성 인원에 따라 HP를 15~25% 늘려준다. 여기에 상대 방어력을 낮추는 관통력이 10%~20% 오른다. 즉, 유지력과 대미지를 동시에 올릴 수 있는 시너지다. 추천 파이터는 셸미와 유리다. 셸미는 일부 대형 보스를 제외한 모든 적에게 명중하는 '잡기형' 스킬로 무장했다. 여기에 적의 방어력을 낮추는 관통력이 들어가 확실한 추가 피해를 가한다. 유리는 같은 열 아군의 공격력 증가와 민첩 상승으로 턴을 끌어온다. 액티브가 잡기형이라 셸미와 동일한 효과를 누릴 수 있다.
견고는 치명 피해 저항과 HP 증가다. 오직 치명타 피해에만 대미지가 감소하기에 주로 PvP에서 사용하면 좋은 시너지다. 편성에 따라 치명 피해 저항 20~40%, HP 15~25%가 증가한다. 추천 파이터는 클락과 랄프다. 우선 클락은 자신을 포함한 같은 열 아군의 방어력 40% 증가, 전열 편성 시 자신의 HP 20% 상승 능력이 있다. 이를 토대로 단단한 탱커로 자리매김하고, 잡기형인 액티브와 피니시로 확정 피해를 주는 건 덤이다.
랄프는 클락과 반대로 같은 열 아군에게 공격력 40% 버프를 준다. 패시브는 클락과 같아 자체 체력이 증가한다. 다만, 클락과 달리 액티브만 잡기형이고, 피니시는 타격형이라 빗나가는 경우가 발생할 수도 있으니 참고하자.
오로치 캐릭터 전용 타입 스페셜
마지막 스페셜은 현시점에서 오로치 캐릭터만 갖고 있다. 분류는 스페셜 하나로 묶였지만, 효과는 2가지로 나뉜다. 아울러 동시에 편성하면 효과를 받을 수 없어 1명만 파티에 넣어야 하는 점을 꼭 기억하자. 아울러 '획득 효과'가 있는데, 오로치 이오리는 모든 팀원의 HP 100%, 오로치 레오나는 공격력 100% 상승한다.
오로치 이오리의 광분은 자신이 적에게 입히는 피해 75% 증가, 자신이 생존 중인 동안 다른 아군의 공격력 & HP 15% 상승, 다른 아군이 공격 성공 시 자신의 남은 턴 쿨타임 10% 감소, 자신이 공격 성공 시 다른 아군의 남은 턴 쿨타임 10% 감소가 있다. 간단하게 설명하자면, 아군과 자신의 스킬 쿨타임을 줄이는 능력이다. 쿨타임이 수시로 줄어드는 만큼 액티브 스킬을 자주 사용하는 셈이다.
오로치 레이나의 시너지는 광란이다. 메인 효과는 자신과 아군의 PG 충전이다. 충전량은 30으로, 조건은 오로치 이오리와 동일하다. 이 외에 자신이 적에게 입히는 피해 75%, 다른 아군의 공격력 및 HP 증가 효과는 똑같다.
스페셜은 앞서 언급한 것처럼 동시에 편성 시 효과가 적용되지 않는다. 따라서 자신의 파티 콘셉트나 파이터 능력에 맞춰 편성해야 제대로 된 효과를 발휘한다. 예를 들어 오로치 이오리는 스킬 쿨타임을 줄이니 쇄도 시너지와 함께 편성하면 좋다. 오로치 레오나는 PG 게이지가 상시 충전되어 빠른 필살기 발동이 가능하다. 따라서 격노 시너지와 함께 편성하면, 더 강력한 피니시 스킬을 연이어 사용할 수 있다.
- [gamescom 26] An RPG set in the US dominated by Japanese culture is coming
- "I am back": Kylian Mbappé selected as cover model for EA Sports FC 27
- Webzen's 'Dragon Sword: Awakening' Injunction Dismissed, Steam Launch Confirmed
- High-end Gaming PC Giveaway Event Hosted for Kakao PUBG
- KEL PUBG Mobile Finals to be Held in Daejeon on the 25th
- Hyper Boost and Level Revamp, Black Desert Second Half Roadmap Revealed
- Epic Games Store Summer Sale Begins with Discounts Up to 80%
- The Seven Deadly Sins: Grand CROSS, TS characters of Meliodas and Ban arrive
- Unity 7 Roadmap Unveiled, Unite Seoul 2026 Held at COEX
- Mbappe and Bellingham on the Cover, 'EA Sports FC 27' Launches September 25




