
[Game of Thrones: Kingsroad Tips] New Region 'Stormlands' Bounty Hunt Guide
[왕좌의 게임 꿀팁] 신규 지역 ‘스톰랜드’ 현상수배 총 정리
Game of Thrones: Kingsroad has just dropped its latest update, introducing the fresh region of Stormlands. Frankly, it is a proper mess—still reeling from the bitter defeat in the War of the Five Kings, the area is now overrun by fanatical cultists and a grotesque plague. As if that wasn't enough, the place is crawling with wanted criminals, leaving the poor residents of the Stormlands pushed to the absolute brink.
Unlike other regions, the Stormlands are teeming with criminals whose crimes are deeply rooted in religious strife. From looting the shrines of the Seven to blaspheming the Lord of Light, the motives here are clear: the consequences of their lord, Stannis Baratheon, switching his faith are coming back to haunt everyone. For the juicy details, keep an eye on the upcoming KookminTree storyboard.
The Stormlands are divided into three zones, with a total of 15 wanted criminals across them—some zones have six, others three. Bagging all of them will net you a handy 26 extra weapon mastery points. Just a heads-up, mate: your choices matter, and the way you complete these bounties can change, so don't treat the images below as the absolute gospel. Use 'ctrl + f' to search for the specific zone or name you're hunting.
Storm's End Bounty: Danion
[1] Pick up the bounty poster at the designated location
[2] Search for clues at the spot to trigger a chat with 'Anol'
[3] Chat with the 'Red Priest' at the marked location to persuade them
[4] Head to the spot, watch the cutscene, win the fight against Danion, and job's a good 'un
Storm's End Bounty: Barton
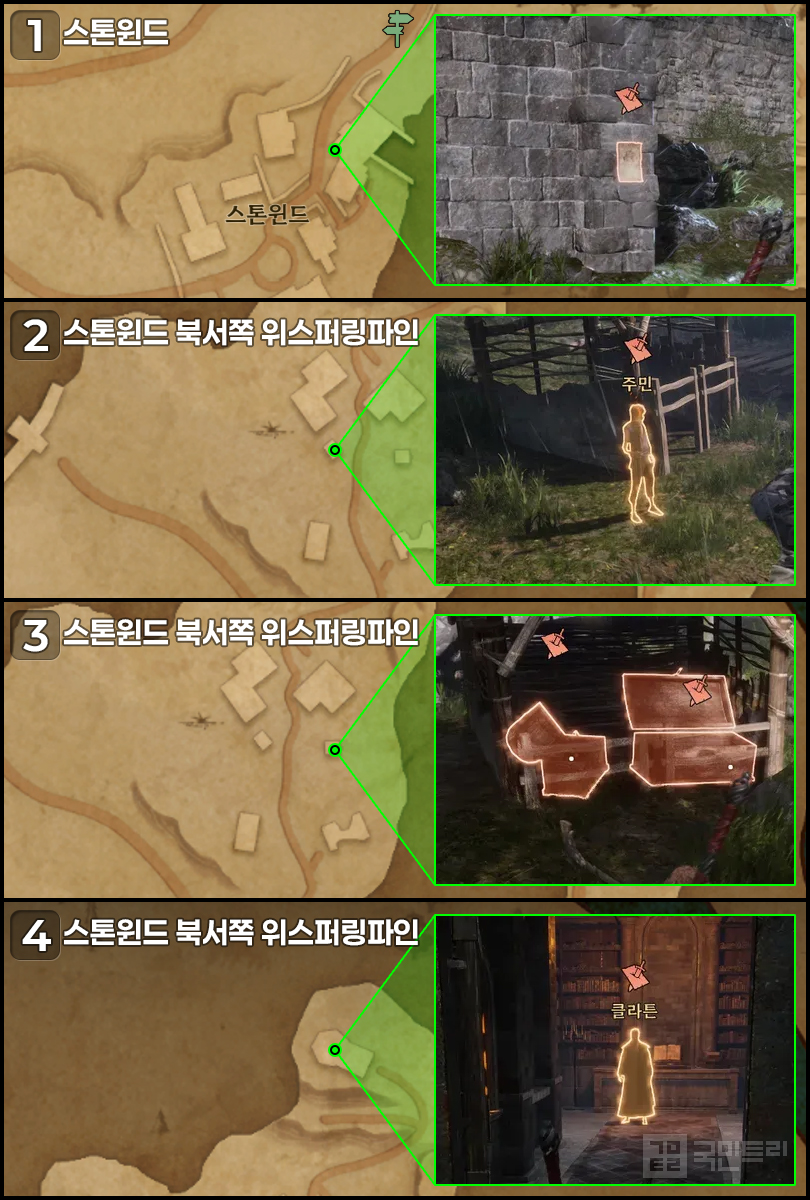
[1] Pick up the bounty poster at the designated location
[2] Chat with the 'Resident' at the marked location
[3] Search the luggage at the spot to trigger a chat with the 'Resident'
[4] Talk to 'Klaton' to finish the fight, then chat with the 'Resident' outside the shrine for an extra skirmish to wrap it up
Storm's End Bounty: Roland
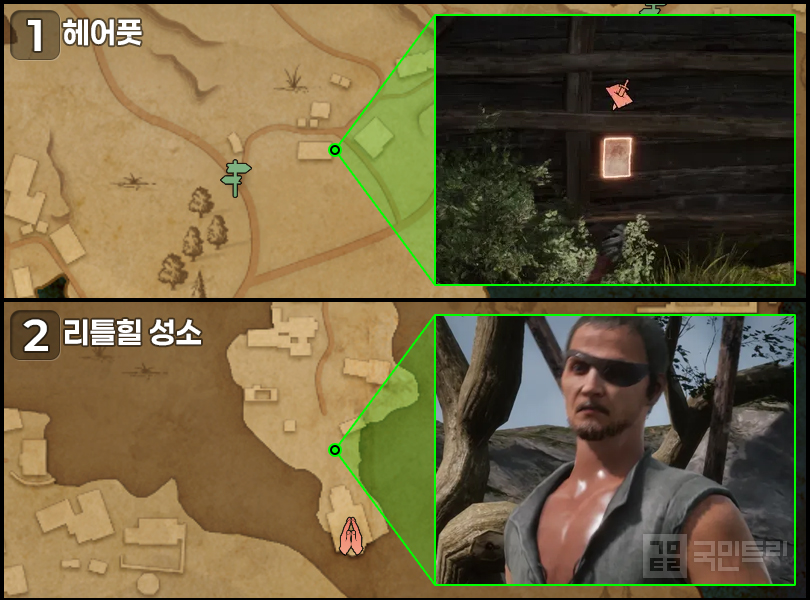
[1] Pick up the bounty poster at the designated location
[2] Trigger the forced event upon arrival, then take down 'Roland' inside the shrine
Storm's End Bounty: Jen Elmure
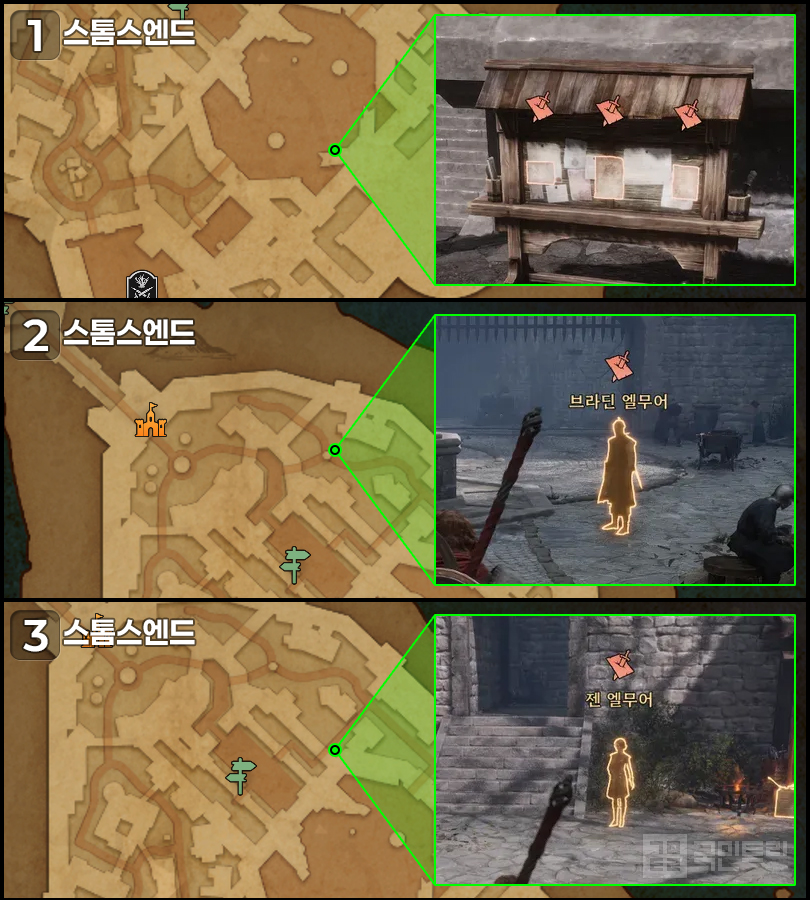
[1] Pick up the bounty poster at the designated location
[2] Chat with 'Bradin Elmure' at the marked location
[3] Talk to 'Jen Elmure', give chase, and fight based on your choices to finish
Storm's End Bounty: Godric Storm
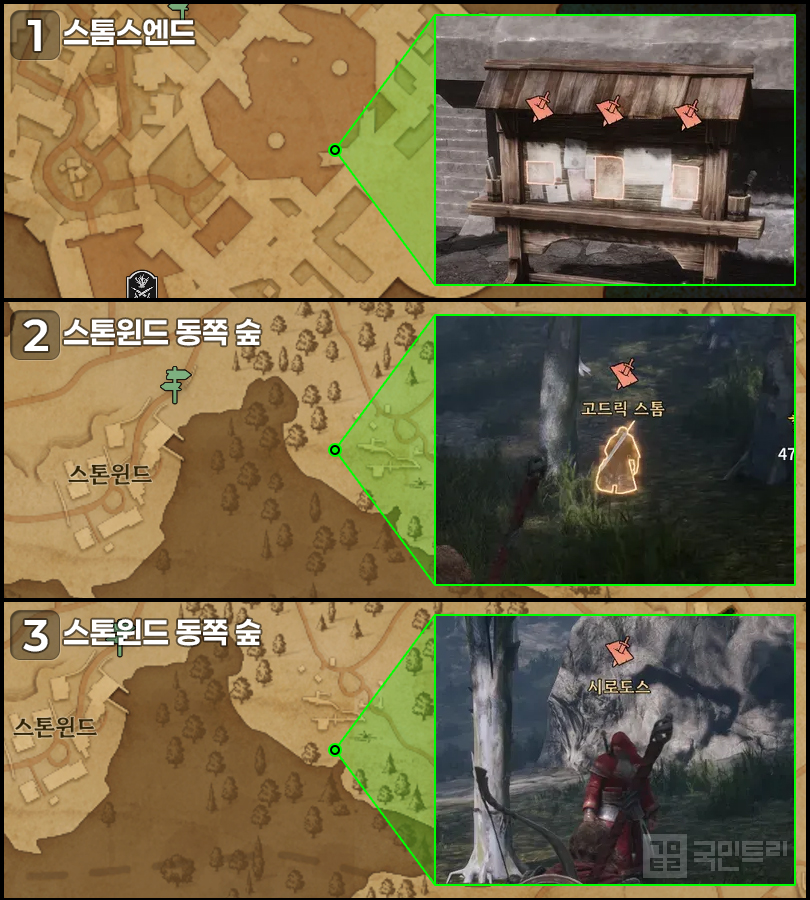
[1] Pick up the bounty poster at the designated location
[2] Chat with 'Godric Storm' and choose to help them out
[3] Take down 'Shirodos', then defeat 'Godric Storm' to complete the task
Storm's End Bounty: Soren Raker
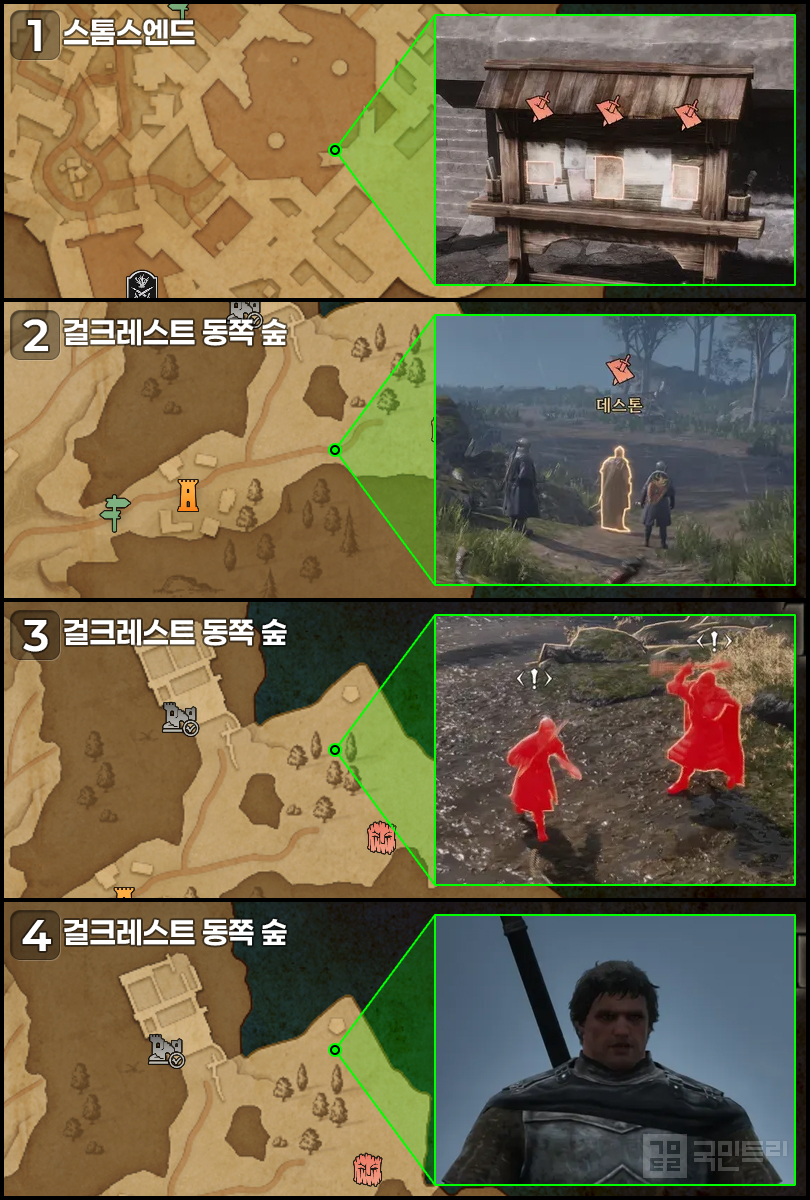
[1] Pick up the bounty poster at the designated location
[2] Chat with 'Destone' at the marked location
[3] Engage in a fight with the deserters at the spot
[4] Defeat 'Soren Raker' and you're done
Fellwood Bounty: Som
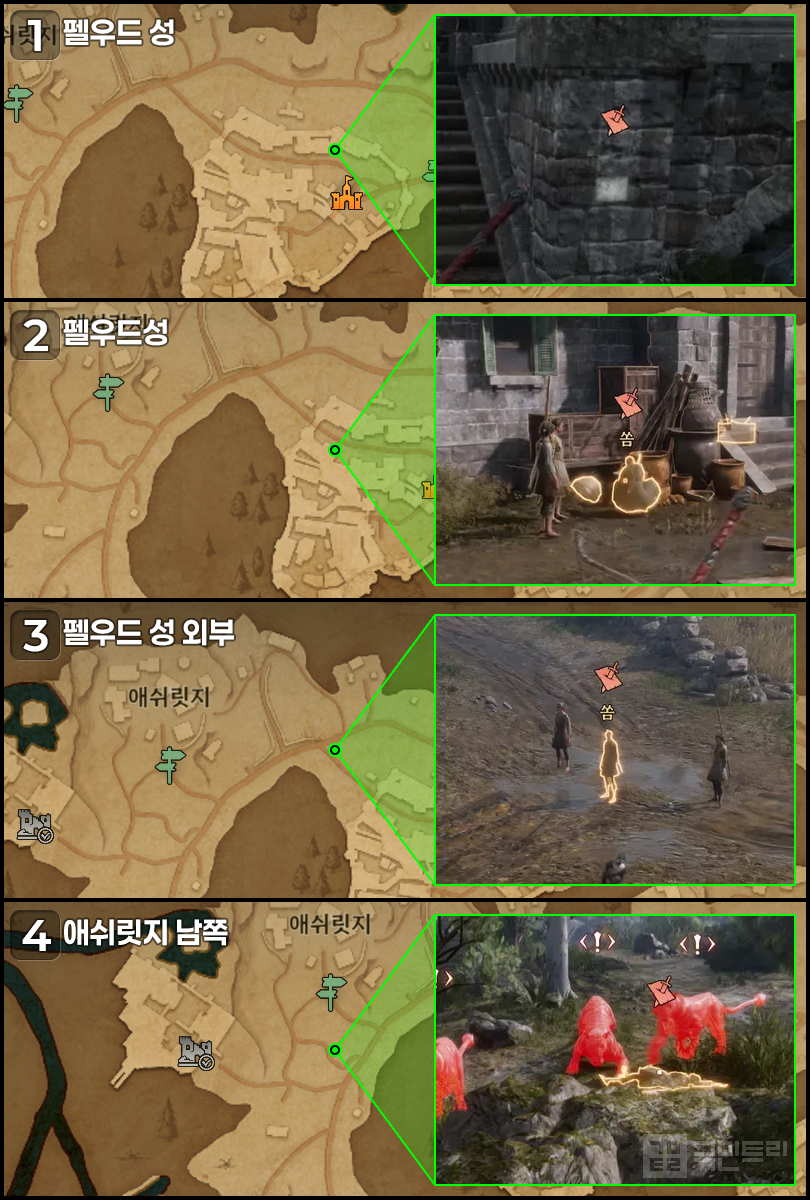
[1] Pick up the bounty poster at the designated location
[2] Arrive at the spot to trigger an automatic event and combat
[3] Arrive at the spot to trigger an automatic event and combat
[4] Take down the wolves and search 'Som's' remains to finish
Fellwood Bounty: Maria Wilkes
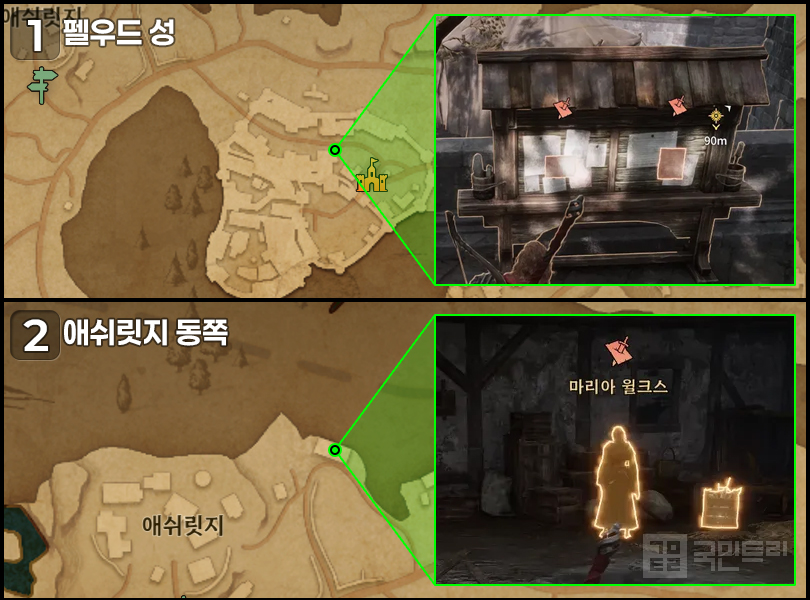
[1] Pick up the bounty poster at the designated location
[2] Chat with 'Maria Wilkes', take her down, and destroy the censer to wrap it up
Fellwood Bounty: Fenton Storm
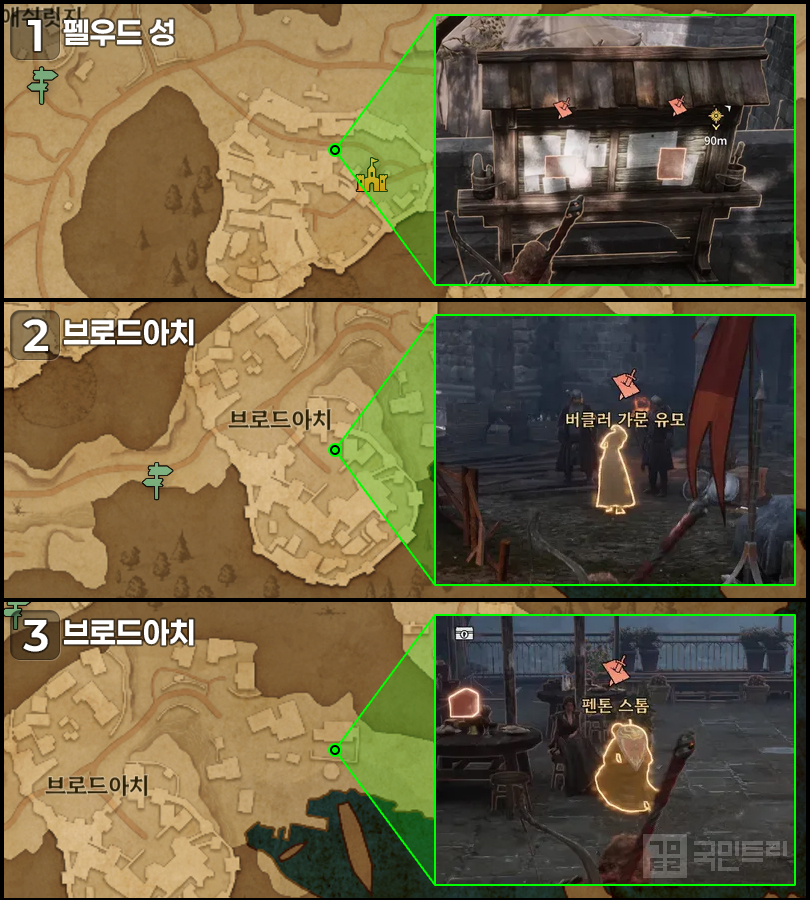
[1] Pick up the bounty poster at the designated location
[2] Chat with the 'Buckler Family Nanny' at the marked location
[3] Trigger the event upon arrival, win the fight, and you're sorted
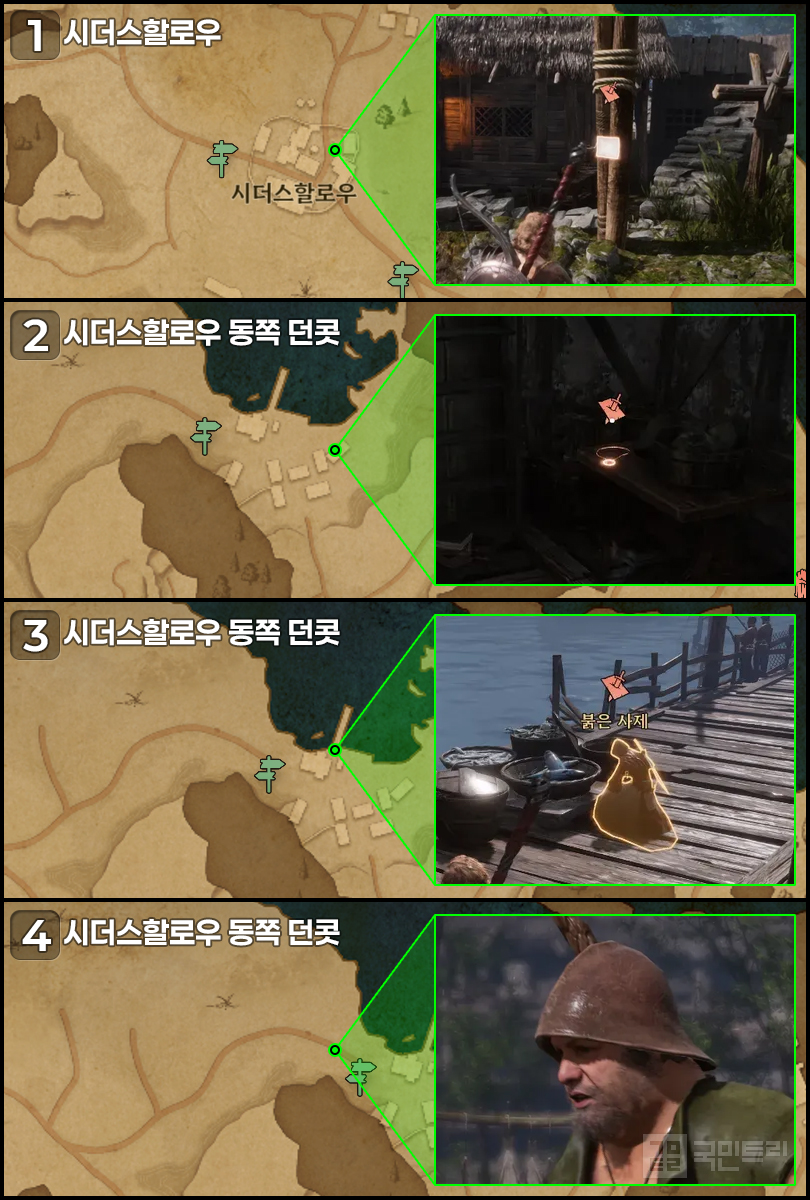
Crow's Nest Bounty: Sia
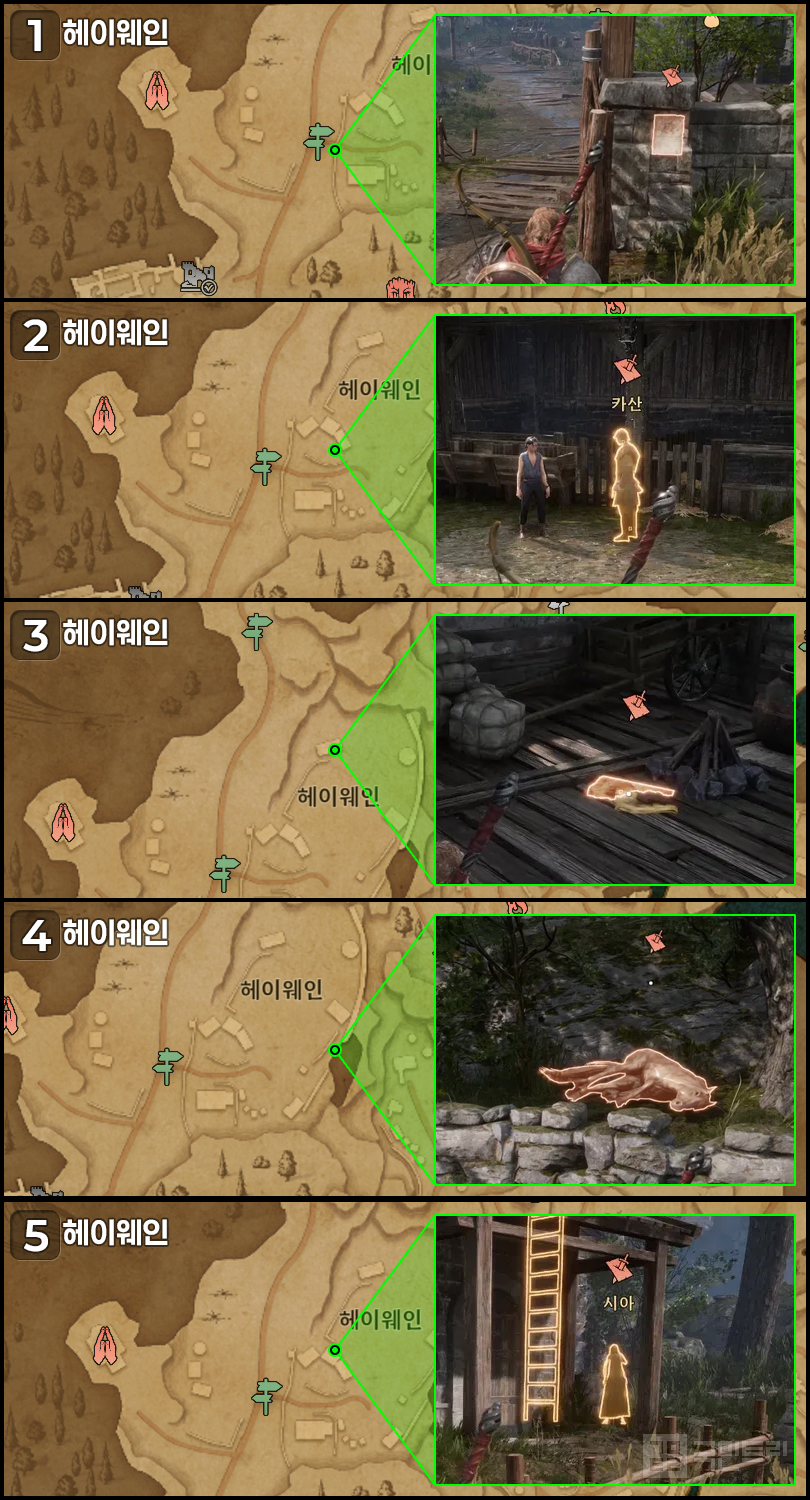
[1] Pick up the bounty poster at the designated location
[2] Chat with 'Kasan' at the spot to gather clues
[3] Fight the mercenaries and search the area for clues
[4] Examine the horse at the location for another clue
[5] Chat with 'Sia' to finish
Crow's Nest Bounty: Mulder Storm
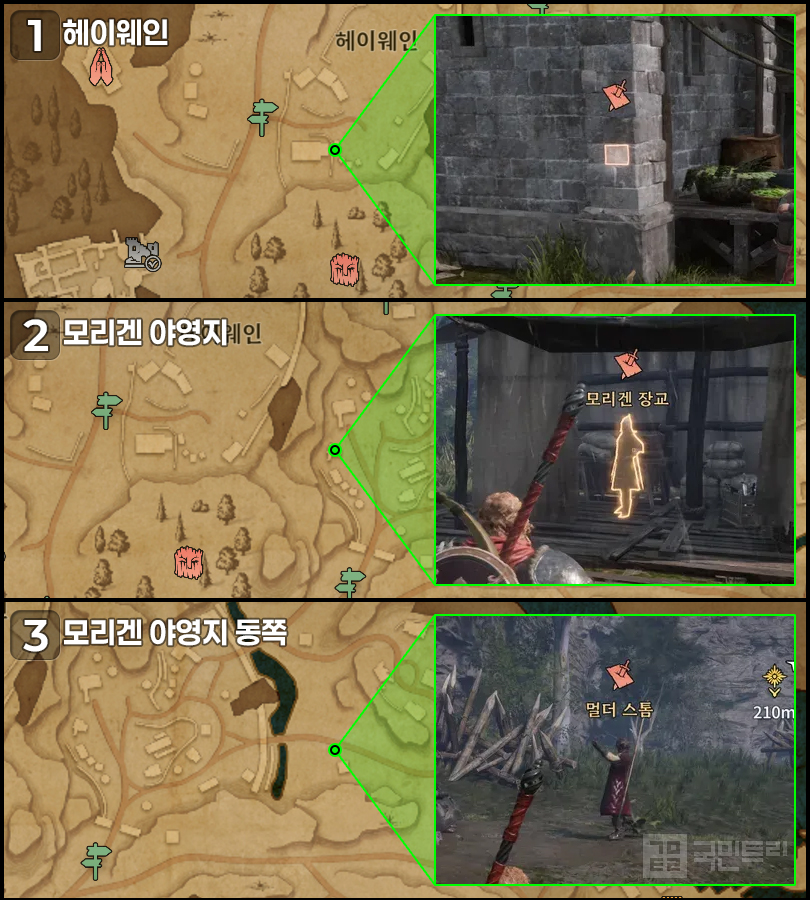
[1] Pick up the bounty poster at the designated location
[2] Chat with the 'Morigen Officer' at the marked location
[3] Take down 'Mulder Storm' to wrap it up
Crow's Nest Bounty: Darion
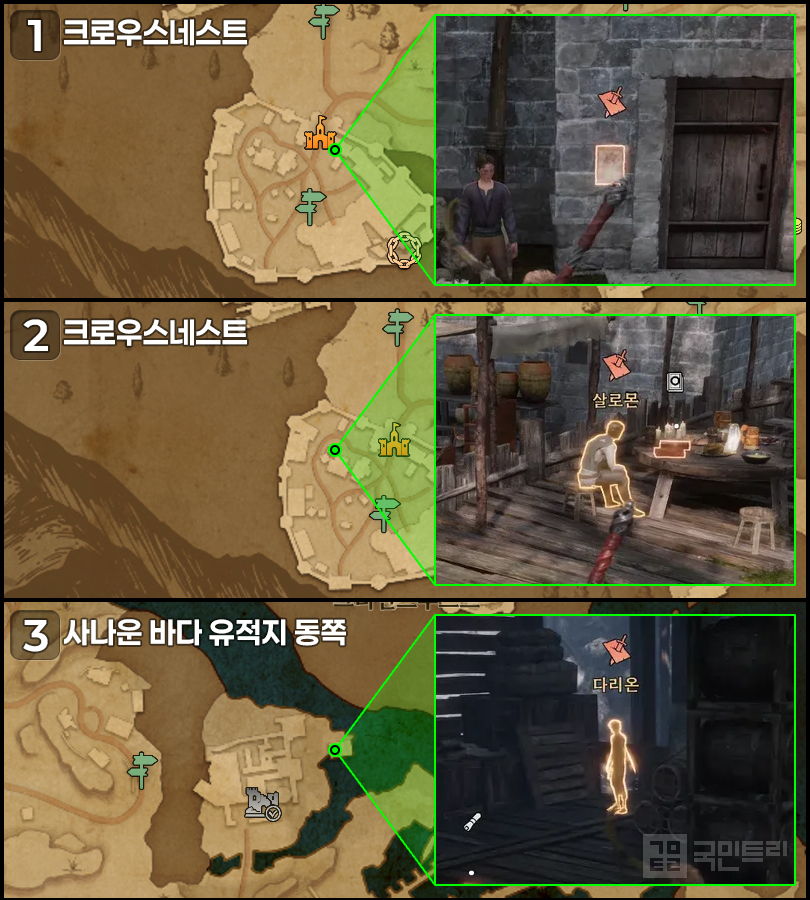
[1] Pick up the bounty poster at the designated location
[2] Chat with 'Salomon' at the spot to get a clue
[3] Take down 'Darion' to finish
Crow's Nest Bounty: Red Pen
[1] Pick up the bounty poster at the designated location
[2] Enter the shrine to trigger a forced event, win the fight, and you're set
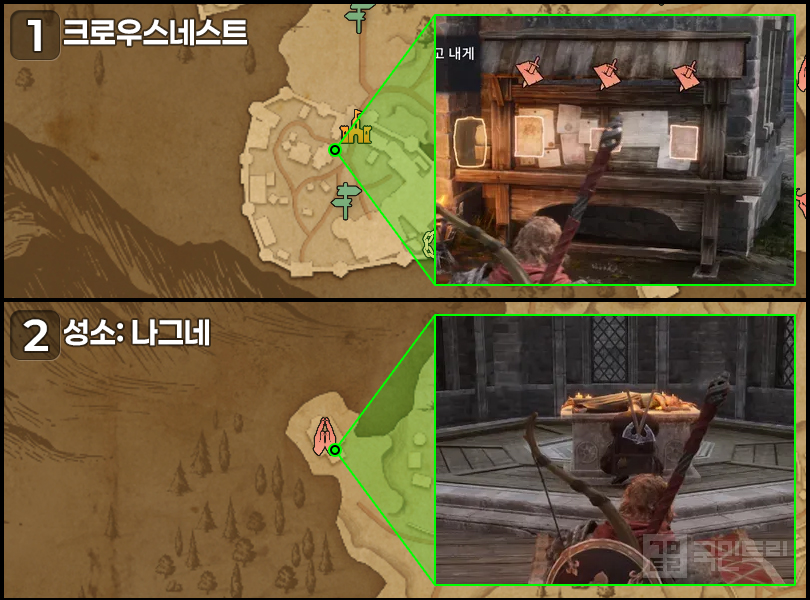
Crow's Nest Bounty: Tia
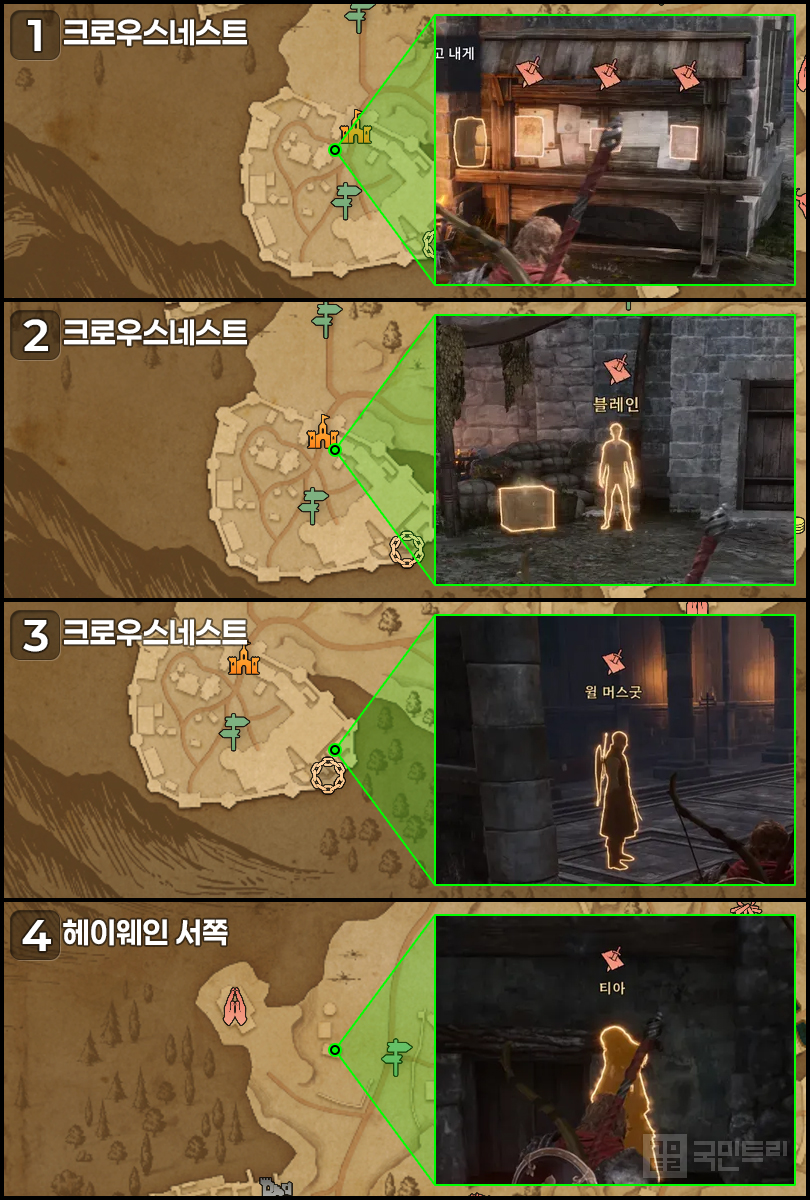
[1] Pick up the bounty poster at the designated location
[2] Chat with 'Blaine' at the spot to gather a clue
[3] Chat with 'Will Musgood' at the spot to gather another clue
[4] Chat with 'Tia', win the fight against Will Musgood, and that's it
Crow's Nest Bounty: Shaker
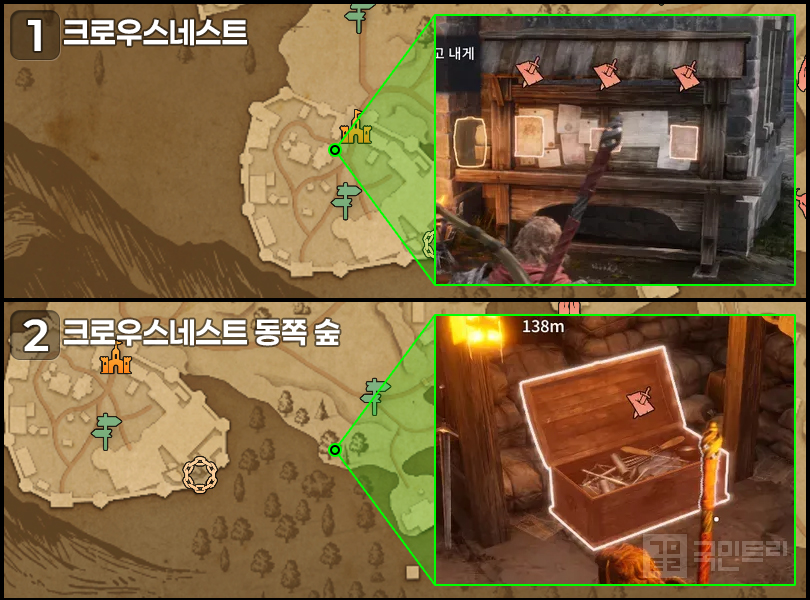
[1] Pick up the bounty poster at the designated location
[2] Grab the clue in the basement, trigger the fight with 'Shaker' on your way out, and finish the job
‘왕좌의 게임: 킹스로드’가 신규 지역 ‘스톰랜드’를 업데이트했다. 스톰랜드는 ‘다섯 왕의 전쟁’에서 패배한 뼈아픈 대가를 치르고 있는 가운데, 광신도들의 횡포와 끔찍한 전염병까지 덮쳐 혼돈 그 자체인 상황이다. 심지어 각종 현상수배범마저 들끓으며 스톰랜드 주민들을 벼랑 끝으로 내몰고 있다.
다른 지역과 달리 스톰랜드의 현상수배범은 유독 종교와 관련된 범죄자들이 많다. 일곱 신의 성소를 약탈, 붉은 신을 모독 등 다양한 종교와 관련된 범죄가 나오는데, 이는 스톰랜드의 영주 ‘스타니스 바라테온’이 개종한 여파로 보인다. 관련한 자세한 이야기는 추후 국민트리 스토리보드에서 확인하자.
스톰랜드는 3개 권역으로 이뤄져 있고 권역마다 6명, 또는 3명의 범죄자가 현상수배 중이다. 이들을 모두 합하면 총 15명이며, 잡아넣어서 26개의 무기 특화 포인트를 추가로 얻을 수 있다. 참고로 유저의 선택에 따라 현상수배를 완료하는 방법이 달라지니, 아래 이미지가 정답은 아니다. 원하는 현상수배 지역이나 현상수배범 이름을 'ctrl + f'로 찾으면 내용을 확인할 수 있다.
스톰스엔드 현상수배: 다니온
[1] 해당 위치에서 현상수배 포스터 획득
[2] 해당 위치의 단서들을 수색하면 등장하는 '아놀'과 대화
[3] 해당 위치의 '붉은 사제'와 대화해서 설득
[4] 해당 위치에 도달하면 컷신 진행 후 전투 발생, 다니온을 쓰러트리면 완료
스톰스엔드 현상수배: 바튼
[1] 해당 위치에서 현상수배 포스터 획득
[2] 해당 위치의 '주민'과 대화
[3] 해당 위치의 짐을 수색하면 등장하는 '주민'과 대화
[4] 해당 위치의 '클라튼'과 대화해서 전투 완료하고, 성소 밖 '주민'과 대화해서 추가 전투 진행하면 완료
스톰스엔드 현상수배: 롤란드
[1] 해당 위치에서 현상수배 포스터 획득
[2] 해당 위치에 도착하면 강제 이벤트 진행, 이후 성소 안에 있는 '롤란드'와 전투해서 완료
스톰스엔드 현상수배: 젠 엘무어
[1] 해당 위치에서 현상수배 포스터 획득
[2] 해당 위치의 '브라딘 엘무어'와 대화
[3] 해당 위치의 '젠 엘무어'와 대화하고 추격, 이후 선택지에 따라 전투 진행 후 완료
스톰스엔드 현상수배: 고드릭 스톰
[1] 해당 위치에서 현상수배 포스터 획득
[2] 해당 위치의 '고드릭 스톰'과 대화 후, 도와준다를 선택
[3] 해당 위치의 '시로도스'를 처치하고, '고드릭 스톰'을 쓰러트리면 완료
스톰스엔드 현상수배: 소렌 레이커
[1] 해당 위치에서 현상수배 포스터 획득
[2] 해당 위치의 '데스톤'과 대화
[3] 해당 위치의 탈영병들과 전투
[4] 해당 위치의 '소렌 레이커'와 전투 후 완료
펠우드 현상수배: 쏨
[1] 해당 위치에서 현상수배 포스터 획득
[2] 해당 위치에 도착하면 자동 이벤트와 함께 전투 진행
[3] 해당 위치에 도착하면 자동 이벤트와 함께 전투 진행
[4] 해당 위치의 늑대를 쓰러트리고 '쏨'의 시체를 수색하면 완료
펠우드 현상수배: 마리아 윌크스
[1] 해당 위치에서 현상수배 포스터 획득
[2] 해당 위치의 '마리아 윌크스'와 대화하고 쓰러트린 다음, 향로를 파괴하면 완료
펠우드 현상수배: 펜톤 스톰
[1] 해당 위치에서 현상수배 포스터 획득
[2] 해당 위치의 '버클러 가문 유모'와 대화
[3] 해당 위치에 도착하면 이벤트 진행 후 전투, 승리하면 완료
크로우스네스트 현상수배: 시아
[1] 해당 위치에서 현상수배 포스터 획득
[2] 해당 위치의 '카산'과 대화해서 단서 획득
[3] 해당 위치의 용병들과 전투하고, 탐색으로 단서 획득
[4] 해당 위치의 말을 탐색해서 단서 획득
[5] 해당 위치의 '시아'와 대화해서 완료
크로우스네스트 현상수배: 멀더 스톰
[1] 해당 위치에서 현상수배 포스터 획득
[2] 해당 위치의 '모리겐 장교'와 대화
[3] 해당 위치의 '멀더 스톰'을 쓰러트려 완료
크로우스네스트 현상수배: 다리온
[1] 해당 위치에서 현상수배 포스터 획득
[2] 해당 위치의 '살로몬'과 대화해서 단서 획득
[3] 해당 위치의 '다리온'을 쓰러트려 완료
크로우스네스트 현상수배: 붉은 펜
[1] 해당 위치에서 현상수배 포스터 획득
[2] 해당 위치의 성소 안으로 들어가면 강제 이벤트, 전투에서 이기면 완료
크로우스네스트 현상수배: 티아
[1] 해당 위치에서 현상수배 포스터 획득
[2] 해당 위치의 '블레인'과 대화해서 단서 획득
[3] 해당 위치의 '윌 머스굿'과 대화해서 단서 획득
[4] 해당 위치의 '티아'와 대화하면 윌 머스굿과 전투, 승리하면 완료
크로우스네스트 현상수배: 세이커
[1] 해당 위치에서 현상수배 포스터 획득설명
[2] 해당 위치 지하실에서 단서를 획득하고 나오면 '세이커'와 전투 발생, 승리하면 완료

-
 [Vampir Battle View] Which clans will join the Diamond group for the next match?
-
 Vampir to Improve Clan Vault Distribution Quantity Issue
-
 [Meca Ranking] SKRB Advent Expedition Reaches 1 Billion Points First
-
 [SKRB Action] The Reliable Support for Defensive Decks, 'Clemis'
-
 [Raven 2 Tips] Remaining Schedule for the Grand Festival Finale and Key Rewards Summary
-
 [SKRB Re:PLAY] June - 'Defense Deck New Meta' Emerges with Awakening
-
 [Global Talk] Evenly distribute 'Slot Enhancement' in Game of Thrones: Kingsroad
-
 [Dungeon Race] The '8-second' era begins with [B&S Revolution] Illusionist
- Girls' Frontline mobile competitive shooter development halted after 8 months
- POE 2, A 'Martyr' Appears Who Provided Server-Wide Buffs Through Max-Level 'Character Deletion'
- [Today's steam] New hide-and-seek game where you paint your own body to blend in draws attention
- The Elder Scrolls 6 reaches playable build stage
- Kairosoft Announces Restaurant Management Simulation Set in the One Piece Universe
- Development Resumes for Princess Maker: Children of the Prophecy, Update Scheduled for Late June
- Realistic Promotion Strategies Introduced by Small Indie Developers
- Agency that leaked MapleStory showcase information hit with 50 million KRW damages lawsuit
- [Weekly Game Comic] Dismissing the veteran meritorious retainer, Crazy Arcade BnB
- [Meca Ranking] What is your true form? TOP 5 abnormally light Pokemon